Salon Business Awards Creative Salon of the Year

The Salon Business Awards recognise outstanding salons across the UK who excel in specific areas such as eco credentials, education and business strategies.
We have one category – Creative Salon of the Year – that needs your help. There are five finalists, each of whom has provided an image that represents their salon with a description of the look.
As the Creative category, you are the best people to judge but we have some pointers we want you to keep in mind.
The winning image must do all of these things;
Be in-keeping with the salon brand
Appeal to the industry, as opposed to the consumer
Use innovative techniques
The cut, colour and style must complement each other

Image 1
Describe how you achieved the colour, including products used Working with a natural red head is always an honour. So to enhance our models natural colour we applied a global copper gloss. Bespoking the gloss using Matrix Lacquers in copper and clear to achieve this high shine effect. It brought out the natural copper and red tones perfectly whilst giving it shine for impact.
Describe how you cut the hair Everything about the hair cut is fluid and soft. Taking inch square sections from the crown, and moving out around the head, using a twisting technique and lighting cutting into and down the twists. This enhances the curl and texture without creating lots of layers, so it keeps that lovely weight and fullness at the bottom. Finally softly point cutting the baseline to keep the whole haircut balanced.
Describe how you created the style, including products used Layering Matrix Go Big mouse to towel dried hair, drying through and then applying another lay of mouse to start shaping in the finger waves. Creating five sections- two at the front, two behind the ears and one through the centre of the back. Starting on the back section and finger waving through and pinning in. Doing this for every section then applying heat to dry and leaving to set into shape. Once set I gently brushed out the finger waves with my mason Pearson brush, again starting from the back, very softly and gently. Once all are brushed through gently, I went back in to enhance the front finger waves and defining that front wave more. Then created more texture through the bottom by spreading the waves out more using my fingers and pushed them back on themselves. Then just using GHD final fix hairspray to hold and Matrix Surround shine to polish.
Tell us how the image reflects your salon brand Our brand is all about healthy luxurious hair and this image is a perfect reflection of that. We love to be creative and bold, especially with colour, but we like it to still be super healthy and shiny. Our clients are very classic, so the styling in this is a nod to that but taking the finger waves to the next level with distressing the bottom. We are all about our clients falling back in love with their hair, and how could you not fall in love with this hair!

Image 2
Describe how you achieved the colour, including products used A small diamond section over the crown and top of the head was created and tinted with Wella 12/0 + 0/66 mixtone and pastel (purple haze). Outlining the diamond, a 2 inch section was pre- lightened with Wella Blondor and 6% and toned with Koleston 12/0 + 0/56 mixtone and pastel (muted pink burgundy) the same colour was used to tone the extension hair. A 1 inch halo placement around the perimeter was tinted using Wella Colour Touch 4/0 and 1.9% to depth and s!trength to a 3D effect.
Describe how you cut the hair Back and sides were undercut on a grade 0 using clippers and a solid A line bob was scissor cut and shaped as an overhang over the undercut. A diamond section on the top and crown was slice and point cut into to create texture and movement within the solid perimeter. The fringe was razor cut short to emphasise the overhang and the side focal point was slice and point cut to create sharpness of the extension feature.
Describe how you created the style, including products used The point of the diamond above the ear was extended using 2 rows of pre-tinted taped weft to create an isosceles triangle shape over the right temple. After being blend cut in with the natural hair we applied Kevin Murphy Super.Goo to blowdry into our space shape. On dry hair Kevin Murphy Powder.Puff created the firmness to push into the shape over the undercut and finished w!ith Kevin Murphy Session.Spray.
Tell us how the image reflects your salon brand The image is from a collection that was designed to reflect the Michelle Griffin Brand, it is called ‘SPACE’, forward thinking, creative and futuristic. It shows strength, structure and quality of work which emulates the Michelle Griffin brand.

Image 3
Describe how you achieved the colour, including products used Our model’s hair was on a base 6. We sectioned the hair into prisms isolating the hair line and the nape area and then applied equal parts of Top Chic 8KN and Top Chic 9% peroxide to the root re- growth area. We merged Elumen RR to the outer prism for a copper effect. To compliment the copper we Merged Elumen KK, a rouge tone to the inner prism. We merged Elumen AB to the centre prism for the most vibrant colour of all. Applied Elumen VV to the isolated hair line and nape area, a rich warm hazelnut purple to add depth and dimension to the contrasting colours applied above. After processing we removed with Elumen wash and Elumen locked for 5 minutes. Then rinsed a!nd applied Elumen Treat.
Describe how you cut the hair Taken one large section isolating the hair from below the occipital bone and softly undercut the hair at a 45 degree angle using a sliding cut. I combed all the hair down and freehand cut the hair to the visual shape of an over directed bob. Once this section of hair was dried I used clipper over comb to sharpen, define and rework the hair to get the desired finished effect. After sectioning the hair to a side parting, I used a triangle section on top of the head as the base of the fringe, which again was cut freehand and finished off with clippers over comb for a very bold focal look to compliment the colours.
Describe how you created the style, including products used We created a side parting creating a heavy over the eye fringe to give a focal point. We applied KMS TameFrizz Taming Creme and blow dried using our glass blow dry technique which is blow drying without using a brush, but with your fingers to manipulate the hair’s tension. The heat of the hairdryer and the natural oil from your finger tips enables a smooth glossy finish. Once blow dried into shape we applied KMS Hairstay Anti humidity seal and lightly went over with GHD s!traighteners. Finishing with KMS Hairstay Medium Hold Spray
Tell us how the image reflects your salon brand The image is incredibly strong on colour, but it shows great shine and healthy looking hair with a richness of tone that really appeals to our clients. It is a stronger look that most of our clients would go for, but it demonstrates our ability to create great hair colour in fashion forward tones, whilst maintaining a beautiful feel about it.
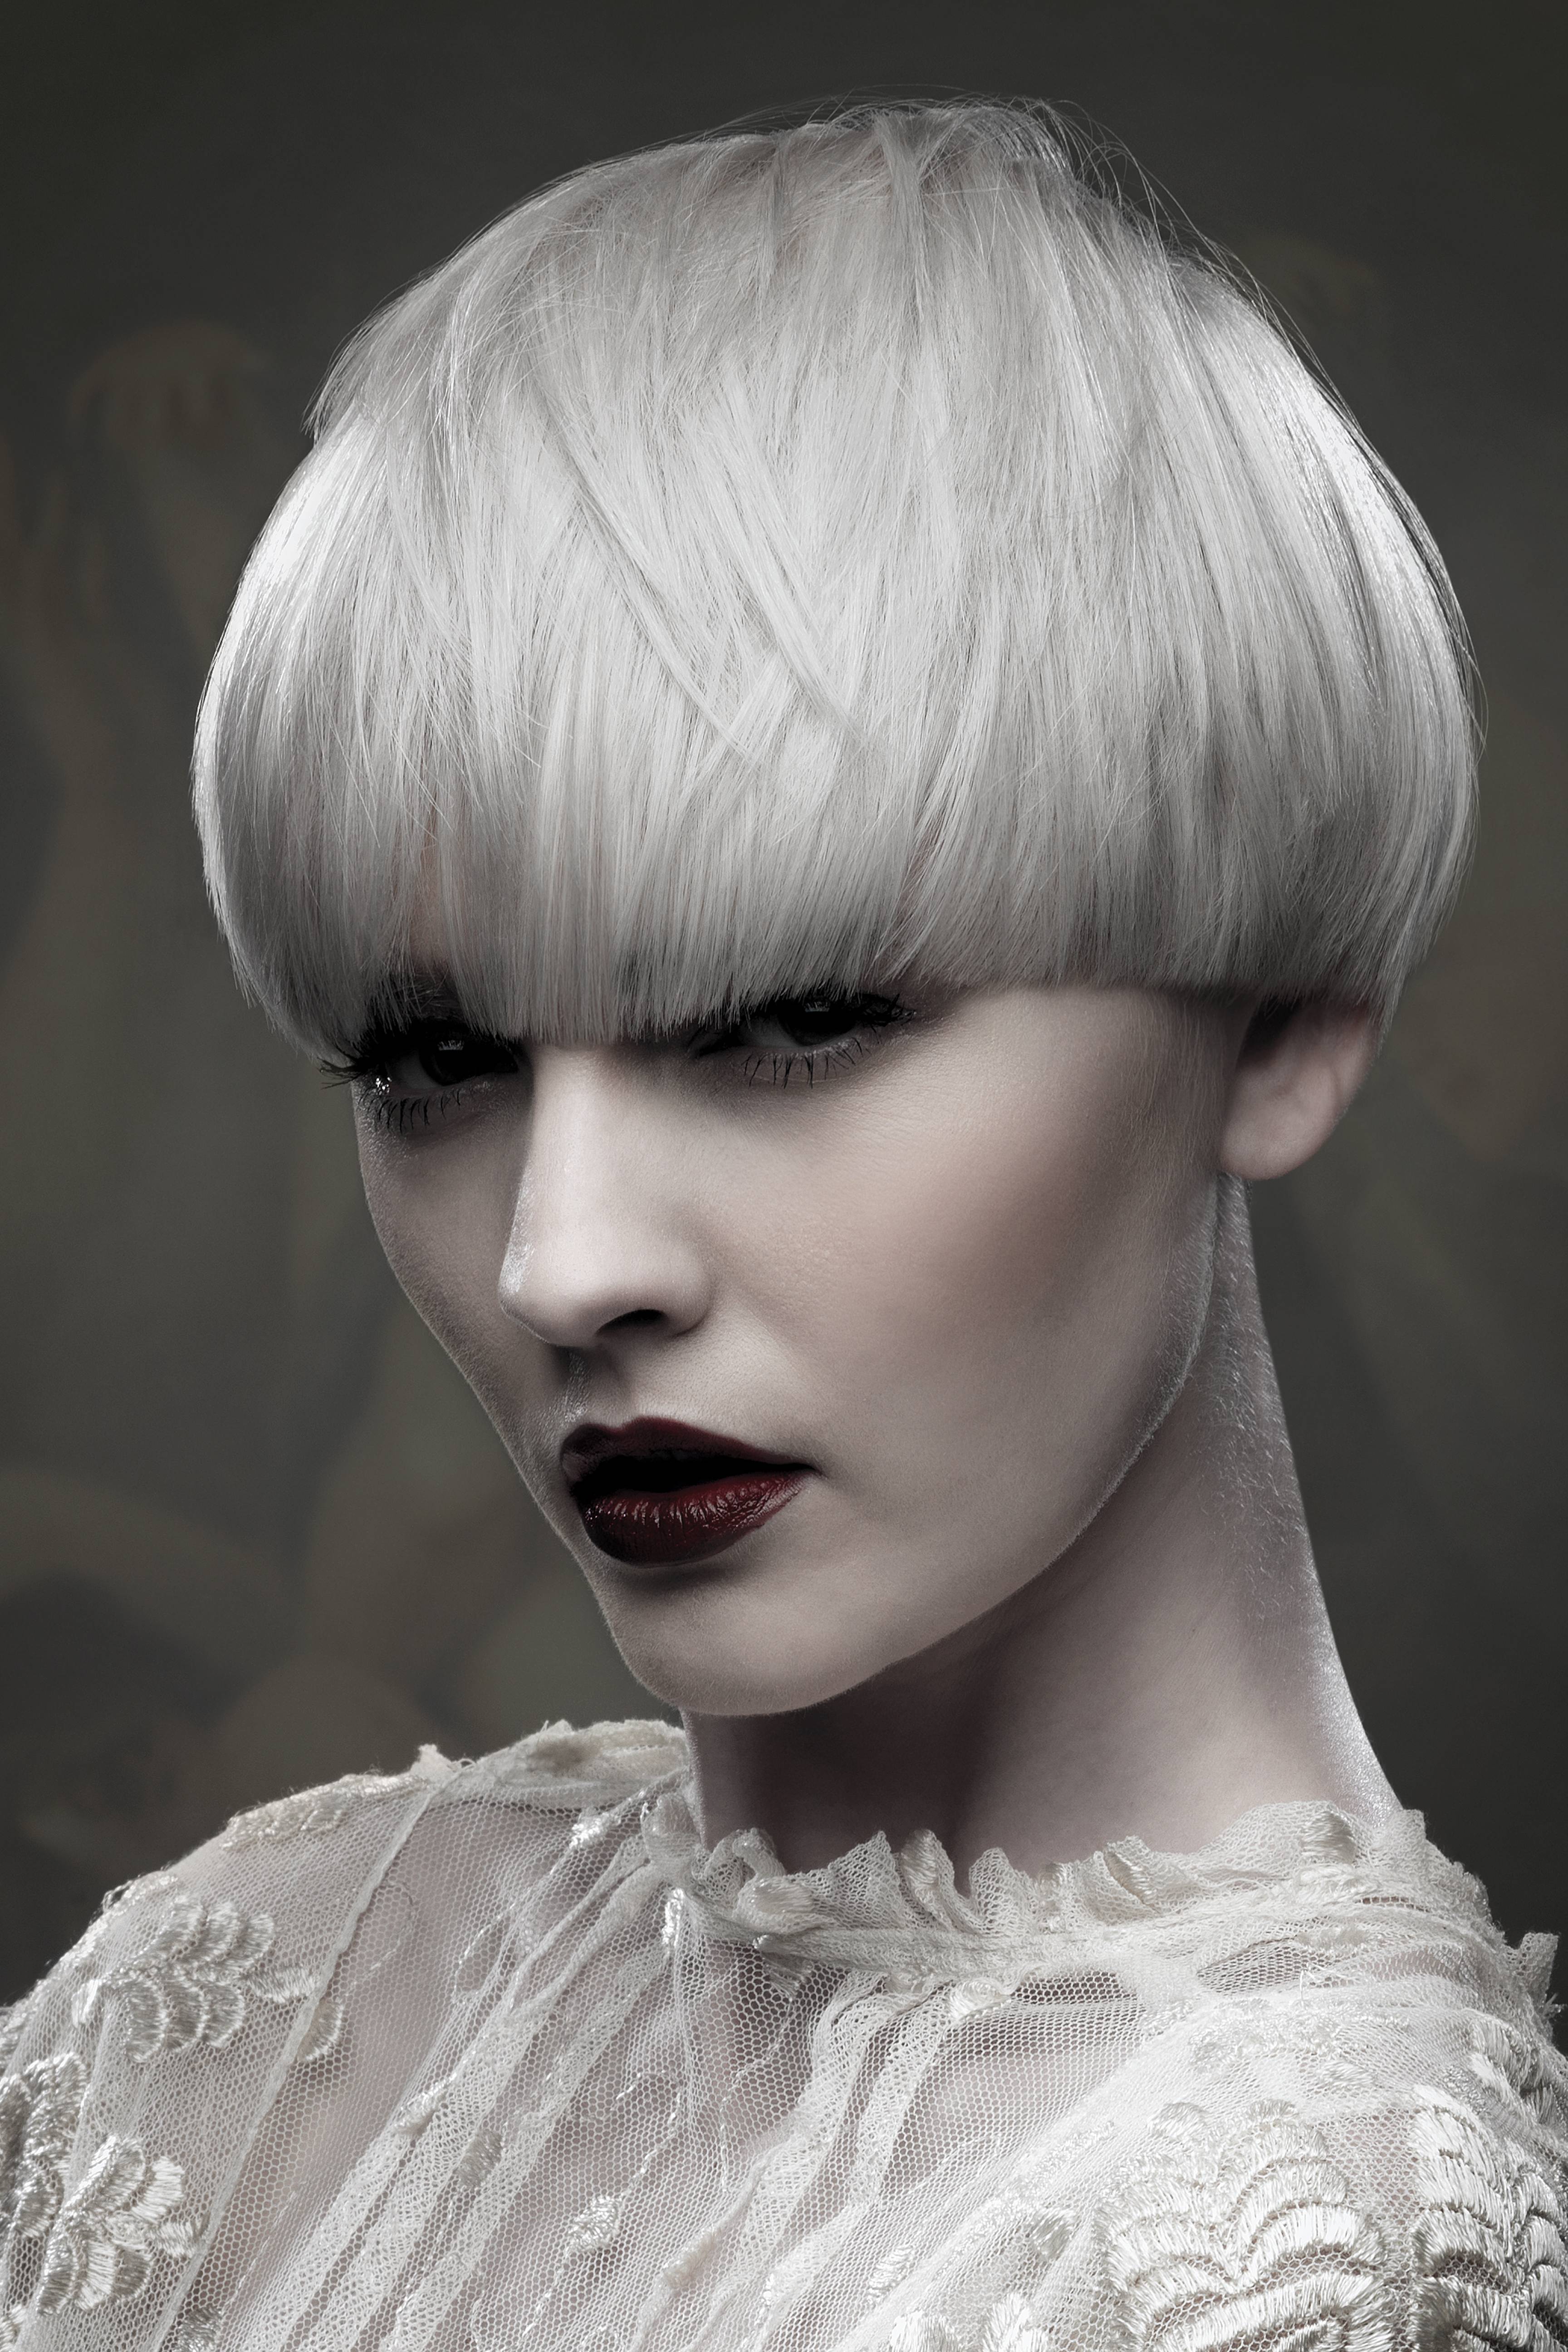
Image 4
Describe how you achieved the colour, including products used We wanted to create a clean, blank canvas on the hair. We commenced with a global root application and pre-lightened the hair using Wella Professional Blondor SoftCreme prelightner with Welloxon Developer 6%. This was left to develop for full development. At the basin, we toned the hair to create a pure swan like blanket of muted cold tones. The colours used were: Koleston Perfect 10/8 (20g grams) with a touch of 0/65 (5 grams). All colouring products by Wella Professional.
Describe how you cut the hair Working from wet hair, we started at the nape of the neck in classic fashion. From below the occipital bone we cut flat horizontal graduation to create a tapers and soft perimental length. Rising up the head working towards the crown, we took a horizontal graduation working from the previous section to create a heavy graduation to build a dense curvature to our silhouette. !
To connect the sides and fringe into our structure, we worked classically by combing the hair down to define the outline and connect. To finish, we added texture by disconnecting a triangle from the high crown to the suture and textured though to add dimension to the finished look.
Describe how you created the style, including products used As the hair was wet we used Flowing Form to create a smooth and controlled style. We created movement with a Denman hairbrush, sweeping the hair onto the face and forward. To style the hair, medium GHD Stylers were used to sleek the hair and Ocean Spritz was sprayed and left to air dry to create a motionless yet defined texture. To finish, the hair was set in place with Dynamic fix medium hold hair spray. (All styling products by Wella Professionals)
Tell us how the image reflects your salon brand This image is the perfect representation of our salon’s brand as it’s perfectly juxtaposed. The softness of the hair against a stern shape really shows beautiful diversity that we hold close the image of the salon. We love the clean and almost clinical element to the colour – styled with a bold lip, it speaks for itself with regards to classic beauty with a modern finish. The element of fresh androgyny is also present in this particular image and we love the regal elements of the photo of a whole.
 Image 5
Describe how you achieved the colour, including products used Suzanne usually has her hair full head bleached. When she came to us she had roots of base 6/7. We needed to colour match her roots to ensure no banding before we could look at adding the fashion colour. We used Schwarzkopf Blonde Me Pre Lightener and 9% in a root application, taking care not to overlap. This was developed until the colour was a nice pale yellow.” Afterwards we applied Blonde Me Lilac with an inch of violet mix tone and applied it to 2 inches from the root area. This was left to develop to the desired lilac tone.” Whilst this was developing we applied a Schwarzkopf Strawberry Tone Shot to the rest of the hair to revive the old previously lightened and a bit dull ends.”
Describe how you cut the hair Suzanne as incredibly fine hair and so we simply cut a very blunt bob to sit at the base of the neck and to the collar bone. No graduation or layering that would simply not work with her hair.”
Describe how you created the style, including products used We wanted to create maximum texture with Suzanne’s hair and so we blow dried it using Clynol Massive Blow Dry Spray – which is great on really fine hair, taking away any static and giving extra volume. We then used micro tongs throughout in very small sections all over the head, gripping them in place until they cooled completely.” We gently removed the grips and teased out the curls with fingers and then used a Mason and Pearson hair brush to brush the curl out into a fluffy texture.” We applied Clynol Powder Punch to the roots to give grip and additional texture to the hair.” Starting at the front hairline, we took two sections and knotted them, leaving the ends loose, then took another two sections and knotted them etc until we reached the nape.” This gives a more modern look that French pleating and a much less complicated and quicker look than braiding. We then used the exposed ends of the hair to create a shape on the one side with masses of texture and a fluffy curl for softness. This styling shows off the beautiful pastel roots and gives the illusion that the hair is much thicker and denser than it actually is.”
Tell us how the image reflects your salon brand We like hair to be beautiful whether on a model or on a client, we don’t like to be dictated by trends, but do like to be able to adapt current trends and include them to ensure that our clients don’t get bored or staid. This look has a very classic and technically correct basis with an added twist – a bit like us really! The model Suzanne absolutely loved the colour and the amount of texture we were able to create in her hair.
How to vote
Send us your name, job title and salon name along with the image number of your favourite look via one of the methods below;
Email awards@salonbusiness.co.uk
Tweet #SBAwards @salon_business